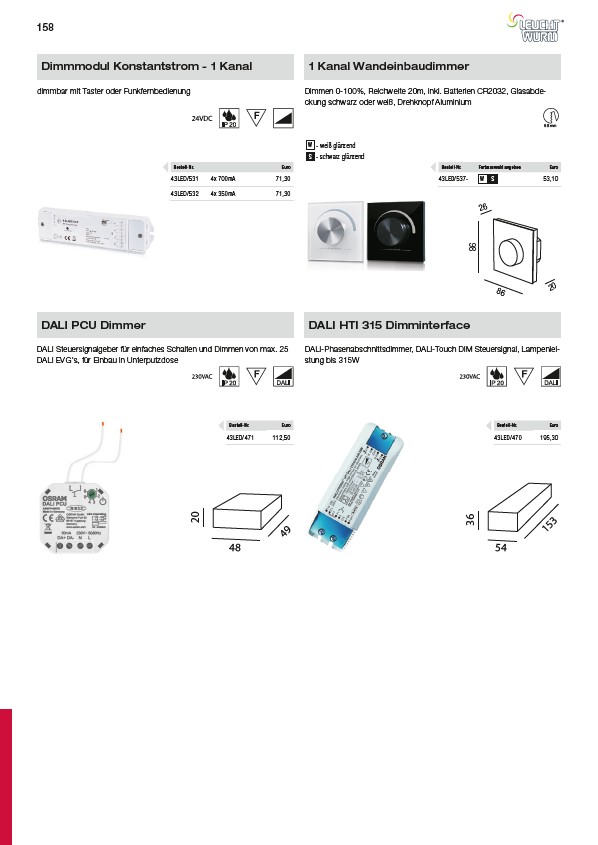
dimmbar mit Taster oder Funkfernbedienung Dimmen 0-100%, Reichweite 20m, inkl. Batterien CR2032, Glasabdeckung
68 mm
158
Dimmmodul Konstantstrom - 1 Kanal 1 Kanal Wandeinbaudimmer
schwarz oder weiß, Drehknopf Aluminium
Bestell-Nr. Euro
43LED/531 4x 700mA 71,30
43LED/532 4x 350mA 71,30
Compatible with different remote controls
Push Dim function available when connect a simple push switch
To dim and switch Single color LED lighting.
Part No. Iuput Voltage Current Output Remarks
43LED/531 12-36VDC 4x700mA 4x(8.4-25.2)W Constant current
43LED/530 12-36VDC 1x8A 1x(96-288)W Constant voltage
Power Supply
12-36VDC
43LED/537-W & 43LED/537-S
43LED/537-W & 43LED/537-S
Operation
DALI PCU Dimmer DALI HTI 315 Dimminterface
Receiver
Receiver
DALI Steuersignalgeber für einfaches Schalten und Dimmen von max. 25
DALI EVG's, für Einbau in Unterputzdose
Power Supply
12-36VDC
Power Supply
12-36VDC
Operation
DALI-Phasenabschnittsdimmer, DALI-Touch DIM Steuersignal, Lampenleistung
bis 315W
Bestell-Nr. Euro
43LED/470 195,30
Operation
once the receiver and remote well paired, the led light flashes means well learned.
Bestell-Nr. Euro
43LED/471 112,50
Bestell-Nr. Farbauswahl angeben Euro
43LED/537- W S 53,10
86
86
26
20
153
54
36
20
49
48
RF Dimmer Receiver
Model: 43LED/531 & 43LED/530
Feature
Parameter
Brief introduction of buttons
Wiring diagram
Product Size
18.6
170.4
45.5
178.9
12-36VDC power input
Connect to push switch
For single color
LED light
Learning to sender
43LED/531
RF Easy Dimmer
4 32 1
Learning Key
GND
Push
Switch
37.0
95.0
85.0
43LED/531
20.0
43LED/530
LED
Input
12-36VDC
For single color LED light
Power input 12-36VDC
Push switch 43LED/530
RF Easy Dimmer
Learning Key Learning to sender
PUSH
N L
110V-230VAC
Single color LED Strip
Single color LED Strip
Single color LED Strip
Single color LED Strip
GND
43LED/531
RF Easy Dimmer
4 32 1
Learning Key
Push
Switch
4x5A
LED
Input
12-36VDC
43LED/530
RF Easy Dimmer
Learning Key
Power Supply
12-36VDC
N L
110V-230VAC
GND
Push
Switch
PUSH
GND
Push
Switch
a. Do wiring according to connection diagram
b . Short press learning key on receiver is when you do pair with remote (see the remote’s use manual accordingly
c . Long press the learning key on receiver over 5 seconds until LED light flash, then delete the learned ID, the receiver will
be reset to factory defaults.
d. When connected to Push Switch, short press push switch for switch ON/OFF,
long press push switch to dim up, long press again to dim down
Each receiver can be controlled by 8 different remotes in max.
W - weiß glänzend
S - schwarz glänzend
RF DIM Wall Panel Dimmer
Feature
43LED/537 is wall rotary RF dimmer with 256 levels logarithmic dimming from 0.1-100% .
Simple and friendly use for dimming and switching ON/OFF for 1z one controlled.
Parameter
I nstall ation
Power supply
Remote
Part No. Operation Voltage Operation
Freq uency
43LED/537-W 3VDC 434MHz/868MHz
Remarks
RF Wireless
43LED/537-S 3VDC 434MHz/868MHz RF Wireless
Wiring diagram
Long time span battery for 2 years
Wireless, easy to change battary
Part No. Iuput Voltage Current Output Remarks
43LED/531 12-36VDC 4x700mA 4x(8.4-25.2)W Constant current
43LED/530 12-36VDC 1x8A 1x(96-288)W Constant voltage
PUSH
N L
110V-230VAC
GND
43LED/531
RF Easy Dimmer
4 32 1
Learning Key
Push
Switch
4x5A
LED
Input
12-36VDC
43LED/530
RF Easy Dimmer
Learning Key
Power Supply
12-36VDC
N L
110V-230VAC
GND
Push
Switch
PUSH
Please pair remote and receiver, after finishing connecting receivers with LED lights diagram above.
1. Press shortly the learning Key on the receiver,then push the rotary button the LED lights will blink on the receiver. Do the same for the other receivers if you many optional receivers as you want.
2. Short push rotary button to switch ON/OFF
Adjust dim brightness by the rotary button from left to right 0.1-100%
Adjust dim brightness by the rotary button from right to left 100-0.1%
Safety & Warnings
1) The product shall be installed and serviced by a q ualified person.
2) IP20.Please avoid the sun and rain. When installed outdoors, please ensure it enclosure.
3) Always be sure to mount this unit in an area with proper ventilation to avoid overheating.
4) Please check if the output voltage of any LED power supplies used comply with product.
5) Never connect any cables while power is on and always assure correct connections before switching on.
6)
Please ensure that the cable is secured tightly in the connector
7) For update information please consult your supplier.
RF DIM Wall Panel Dimmer
Feature
43LED/537 is wall rotary RF dimmer with 256 levels logarithmic dimming from 0.1-100% .
Simple and friendly use for dimming and switching ON/OFF for 1z one controlled.
Parameter
I nstall ation
Power supply
Remote
Part No. Operation Voltage Operation
Freq uency
43LED/537-W 3VDC 434MHz/868MHz
Remarks
RF Wireless
43LED/537-S 3VDC 434MHz/868MHz RF Wireless
Wiring diagram
Long time span battery for 2 years
Wireless, easy to change battary
Part No. Iuput Voltage Current Output Remarks
43LED/531 12-36VDC 4x700mA 4x(8.4-25.2)W Constant current
43LED/530 12-36VDC 1x8A 1x(96-288)W Constant voltage
PUSH
N L
110V-230VAC
GND
43LED/531
RF Easy Dimmer
4 32 1
Learning Key
Push
Switch
4x5A
LED
Input
12-36VDC
43LED/530
RF Easy Dimmer
Learning Key
Power Supply
12-36VDC
N L
110V-230VAC
GND
Push
Switch
PUSH
Please pair remote and receiver, after finishing connecting receivers with LED lights correctlydiagram above.
1. Press shortly the learning Key on the receiver,then push the rotary button .Once the LED lights will blink on the receiver. Do the same for the other receivers if you use themmany optional receivers as you want.
2. Short push rotary button to switch ON/OFF
Adjust dim brightness by the rotary button from left to right 0.1-100%
Adjust dim brightness by the rotary button from right to left 100-0.1%
Safety & Warnings
1) The product shall be installed and serviced by a q ualified person.
2) IP20.Please avoid the sun and rain. When installed outdoors, please ensure it is mounted enclosure.
3) Always be sure to mount this unit in an area with proper ventilation to avoid overheating.
4) Please check if the output voltage of any LED power supplies used comply with the working product.
5) Never connect any cables while power is on and always assure correct connections before switching on.
6)
Please ensure that the cable is secured tightly in the connector
7) For update information please consult your supplier.